What You'll Need
Structure & Lighting
- 20+ Gallon Glass Tank (Screen top preferred)
- Under Tank Heater (UTH) or Ceramic Heat Emitter
- Thermostat (Non-negotiable safety item)
- UVB Bulb (T5 HO or T8) & Fixture
- Digital Thermometer/Hygrometer
Substrate & Hardscape
- Drainage Layer (LECA clay balls)
- Substrate Barrier (Mesh screen)
- Arid Substrate Mix (Sand/Soil/Silt)
- Slate, Rocks, or Driftwood
- At least 2 Hides (Cool side & Warm side)
Plants & Tools
- Succulents, Air Plants, or Sansevieria
- Tongs or Tweezers for planting
- Small shovel or spoon
- Spray bottle (for initial settling)
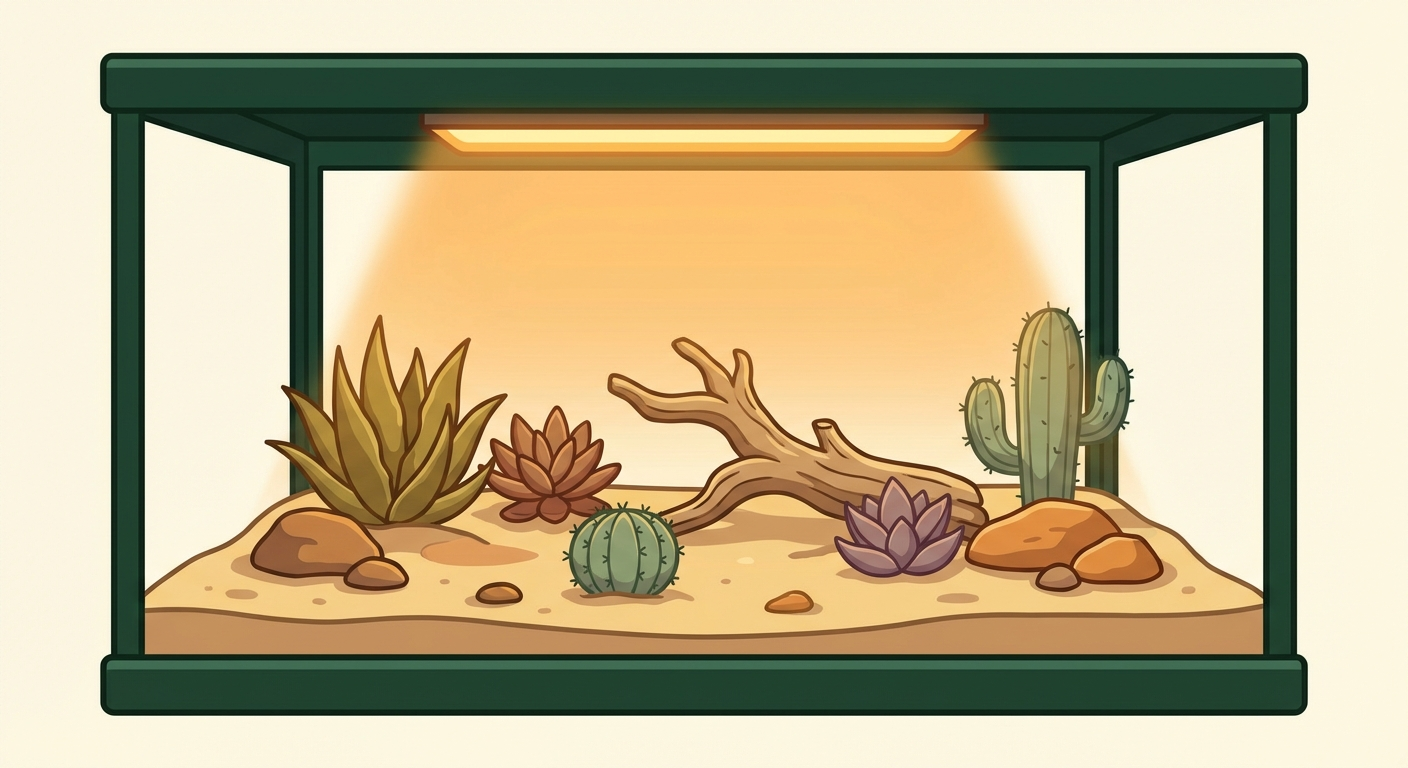
Step 1: Choose Your Enclosure
Before you buy a single bag of sand, you need the right foundation. For arid terrariums, airflow is your best friend. Unlike tropical setups where we want to trap humidity, desert environments need ventilation to prevent mold and keep the air fresh.
We highly recommend a standard glass aquarium with a mesh screen top. A 20-gallon long tank is the perfect starter size—it offers enough floor space for a realistic temperature gradient without being overwhelming. Brands like Exo Terra or Zoo Med offer front-opening tanks which are fantastic for maintenance, but a standard glass tank from a pet store works perfectly fine (and is often cheaper).
If you are housing reptiles, ensure the glass is tempered if you plan to use an under-tank heater. If you are doing a plants-only display, the thickness matters less, but rigidity is still important when you start adding heavy rocks.
Step 2: Plan Your Layout
This is the "measure twice, cut once" phase of terrarium building. You need to visualize the thermal gradient. In the wild, desert animals move from sun-baked rocks to cool burrows. We need to replicate this.
Draw a quick sketch of your tank. Divide it into a "Hot Side" and a "Cool Side."
- Hot Side: This is where your heat source will go. It should have a basking spot—a rock or branch elevated closer to the heat lamp.
- Cool Side: This should have the most cover and the deepest substrate if you plan on having burrowing species.
- Hides: You absolutely need a hide on the hot side AND a hide on the cool side. If a creature only has a cool hide, it may avoid the heat it needs for digestion because it feels too exposed while basking.
Step 3: Add the Substrate
Now for the dirty work. The "floor" of your terrarium isn't just dirt; it's the filtration system and the rooting zone. For a bioactive arid setup, we use a layered approach.
The Drainage Layer (Optional but recommended): Add about 1 inch of LECA (Lightweight Expanded Clay Aggregates) or hydroton balls to the bottom. This creates a reservoir for any excess water so your roots don't rot. Since this is a terrarium and we won't be pouring gallons of water in, this layer can be thinner than in a tropical vivarium—maybe 0.5 to 1 inch.
The Separator: Cut a piece of fiberglass window mesh to fit the tank exactly. Place it over the LECA. This prevents your sandy soil from sifting down into the clay and clogging it. Do not use metal screen; it will rust quickly in a humid environment.
The Soil: Add your arid substrate mix. You want a mix that drains exceptionally well. A commercial "desert mix" or a DIY blend of 60% play sand, 20% potting soil (no fertilizers), and 20% coco fiber works wonders. Aim for a depth of 2 to 3 inches. This allows plants to root securely and gives burrowing animals enough depth.
Step 4: Set Up Heating
Temperature control is the difference between a thriving habitat and a disaster. You have two main choices for heating an arid setup: an Under Tank Heater (UTH) or an overhead Ceramic Heat Emitter (CHE) or Basking Bulb.
UTH: These stick to the bottom of the tank (outside the glass). They heat the ground, which is great for belly heat. However, they don't heat the air much.
Overhead Heat: This mimics the sun. It heats the rock, the air, and the animal. It creates a better ambient temperature gradient.
THE GOLDEN RULE: You must use a thermostat. A thermostat controls the power going to the heater based on a probe you place inside the tank. Without one, a UTH can reach 120°F+ and crack glass or burn animals. Set your basking spot target to roughly 90-95°F (depending on species) and your cool side to 75-80°F.
Step 5: Install Lighting
Light is life. Even if you don't have live plants, your animals need a day/night cycle to regulate their circadian rhythms. If you do have plants, this is non-negotiable.
For desert plants, you need high output. A T5 High Output (HO) fixture is the industry standard. It should span roughly 2/3 of the tank length.
If you are keeping reptiles, you need UVB. UVB allows them to synthesize Vitamin D3, which allows them to process calcium. Without it, they get Metabolic Bone Disease (MBD), a fatal condition. Look for a bulb rated 10.0 or 12% for desert species (like Bearded Dragons) or 5.0 for species that need less (like Leopard Geckos). Replace this bulb every 6-12 months, even if it still lights up, as the UV output fades over time.
Put this on a timer. 10 to 12 hours of light a day is perfect. Don't leave it on 24/7; everyone needs sleep.
Step 6: Add Hardscape & Decor
This is where your personality shines. The hardscape—the rocks and wood—provides the structure your animals will climb on, hide under, and bask upon.
Start by placing your heavy rocks. If you are stacking them to make a cliff, glue them together with aquarium-safe silicone. If an animal digs underneath a stacked rock pile, it can collapse and crush them. Safety first!
Add your branches or driftwood. Mopani wood and grape wood are excellent choices for arid setups as they resist rot. Place a branch diagonally so it creates a ramp toward the heat source.
Finally, place your hides. Ensure the opening is large enough for your animal to fit in comfortably, but snug enough to make them feel secure.
Step 7: Add Plants (Optional)
While not strictly necessary for a "pet tank," plants elevate a terrarium to a piece of art. In an arid setup, you are limited to drought-tolerant species.
Succulents: Jade plants, Echeveria, Haworthia, and Sedum are great choices. Avoid cacti with sharp spines unless you are very careful, or glue the spines off (yes, people do this).
Air Plants (Tillandsia): These don't need soil at all. You can glue them or tuck them into the crooks of branches. They need bright light and airflow.
Snake Plants (Sansevieria): Virtually indestructible. They add nice vertical height.
When planting, create a small divot in the sand, place the plant in, and gently pack the substrate around the roots. Water them lightly immediately after planting to help settle the soil.
Step 8: Cycle & Verify
Resist the urge to add your animal immediately. You need to run the system for at least 48 to 72 hours. This is the "shakedown cruise."
Check your temperatures. Use a digital probe thermometer with a remote sensor. Place the probe directly on the basking spot under the light. Is it 95°F? Good. Move the probe to the cool hide floor. Is it 78°F? Perfect.
Check the humidity. With a screen top, arid tanks should hover between 20% and 40%. If it's higher, increase ventilation. If it's lower and you have plants, you might need to mist a tiny bit more often.
Once your temperatures are stable for three days straight, you are ready for introductions.
Your First Week
Congratulations, the build is done! But the first week is about observation. Here is what to expect:
- Temperature Fluctuations: As the house heats up or cools down, your tank temps will drift slightly. This is normal. However, if the basking spot drops 10 degrees at night, you may need a lower wattage bulb for night time ( Ceramic Heat Emitters don't produce light, just heat).
- Substrate Settling: The sand will compact slightly. You might see gaps form near the glass walls. Simply take a spoon and gently tamp the substrate down against the glass.
- Plant Adjustment: Some succulents might stretch (etiolate) if they aren't getting enough light. If they look "leggy," move the light fixture closer or upgrade the bulb.
- Animal Behavior: If you introduce a reptile, it might hide for the first 3-5 days. This is stress response. Do not handle them. Let them get used to the new sights and smells.
What's Next?
Your terrarium is running, but the journey doesn't stop here. Keep your ecosystem thriving with these resources.